VeraCrypt

Documentation >> Technical Details >> Building VeraCrypt From Source >> Windows Build Guide

This guide describes how to set up a Windows system that can compile the VeraCrypt. Further it is described how VeraCrypt is going to be compiled.
The procedure for a Windows 10 system is described here as an example, but the procedure for other Windows systems is analogous.
The following components are required for compiling VeraCrypt:
  1. Microsoft Visual Studio 2010
  2. Microsoft Visual Studio 2010 Service Pack 1
  3. NASM
  4. YASM
  5. Visual C++ 1.52
  6. Windows SDK 7.1
  7. Windows Driver Kit 7.1
  8. Windows 8.1 SDK
  9. gzip
  10. upx
  11. 7zip
  12. Wix3
  13. Microsoft Visual Studio 2019
  14. Windows 10 SDK
  15. Windows Driver Kit 1903
  16. Visual Studio build tools
Below are the procedure steps. Clicking on any of the link takes directly to the related step:
Installation of Microsoft Visual Studio 2010

  1. Visit the following Microsoft website and log in with a free Microsoft account:
    https://my.visualstudio.com/Downloads?q=Visual%20Studio%202010%20Professional&pgroup=
  2. Please download a (trial) version of “Visual Studio Professional 2010”
  3. Mount the downloaded ISO file by doubleclicking it
  4. Run the file "autorun.exe" as administrator
  5. Install Microsoft Visual Studio 2010 with the default settings
The installation of the Microsoft SQL Server 2008 Express Service Pack 1 (x64) may fail, but it is not required for compiling VeraCrypt.

Installation of Microsoft Visual Studio 2010 Service Pack 1

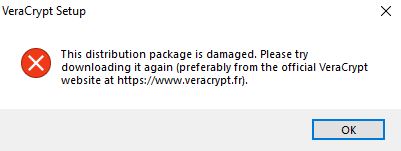
Note: The content the official installer from Microsoft tries to download is no longer available. Therefore, it is necessary to use an offline installer.

  1. Visit the website of the internet archive and download the iso image of the Microsoft Visual Studio 2010 Service Pack 1:
    https://archive.org/details/vs-2010-sp-1dvd-1
  2. Mount the downloaded ISO file by doubleclicking it
  3. Run the file "Setup.exe" as administrator
  4. Install Microsoft Visual Studio 2010 Service Pack 1 with the default settings

Installation of NASM

  1. Download “nasm-2.08-installer.exe” at:
    https://www.nasm.us/pub/nasm/releasebuilds/2.08/win32/
  2. Run the file as administrator
  3. Install NASM with the default settings
  4. Add NASM to the path Variable. This will make the command globally available on the command line.
    1. Open a file explorer
    2. Within the left file tree, please make a right click on "This PC" and select "Properties"
    3. Within the right menu, please click on "Advanced system settings"
    4. Please click on "Environment Variables"
    5. Within the area of the system variables, please select the "Path" variable and click on "Edit..."
    6. Click on "New" and add the following value:

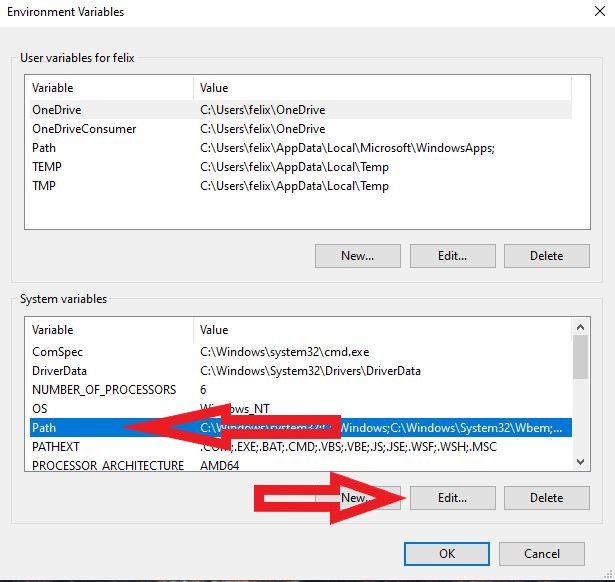
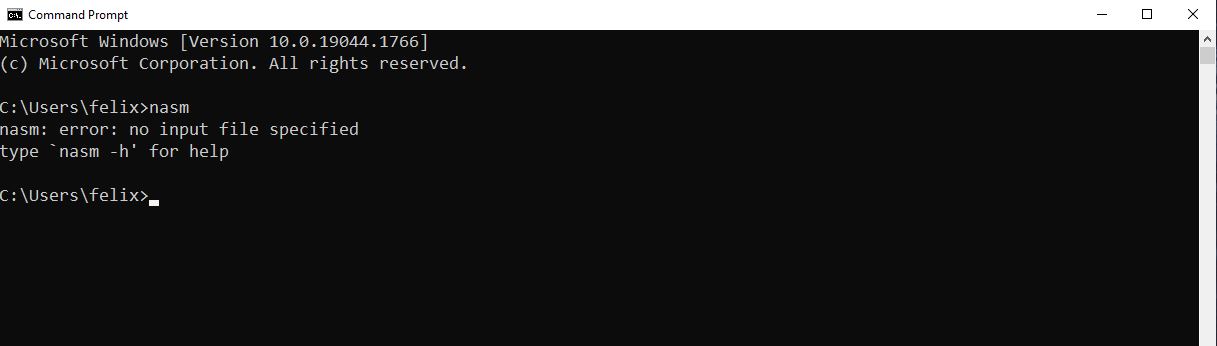
      C:\Program Files (x86)\nasm

    7. Close the windows by clicking on "OK"
  5. To check if the configuration is working correctly, please open a command prompt and watch the output of the following command:

    nasm


Installation of YASM

  1. Please create the following folder:
    C:\Program Files\YASM
  2. Please download the file "Win64 VS2010 .zip" at:
    https://yasm.tortall.net/Download.html
  3. Your browser might inform you that the file might be a security risk due to the low download rate or the unencrypted connection. Nevertheless, the official website is the most reliable source for this file, so we recommend to allow the download
  4. Unzip the zip file and copy the files to “C:\Program Files\YASM”
  5. Please download the file "Win64 .exe" at:
    https://yasm.tortall.net/Download.html
  6. Your browser might inform you that the file might be a security risk due to the low download rate or the unencrypted connection. Nevertheless, the official website is the most reliable source for this file, so we recommend to allow the download
  7. Rename the file to “yasm.exe” and copy it to “C:\Program Files\YASM”
  8. Add YASM to the path Variable and create a new system variable for YASM. This will make the command globally available on the command line.
    1. Open a file explorer
    2. Within the left file tree, please make a right click on "This PC" and select "Properties"
    3. Within the right menu, please click on "Advanced system settings"
    4. Please click on "Environment Variables"
    5. Within the area of the system variables, please select the "Path" variable and click on "Edit..."
    6. Click on "New" and add the following value:

      C:\Program Files\YASM

    7. Close the top window by clicking on "OK"
    8. Within the area of the system variables, please click on "New..."
    9. Fill out the form with the following values:

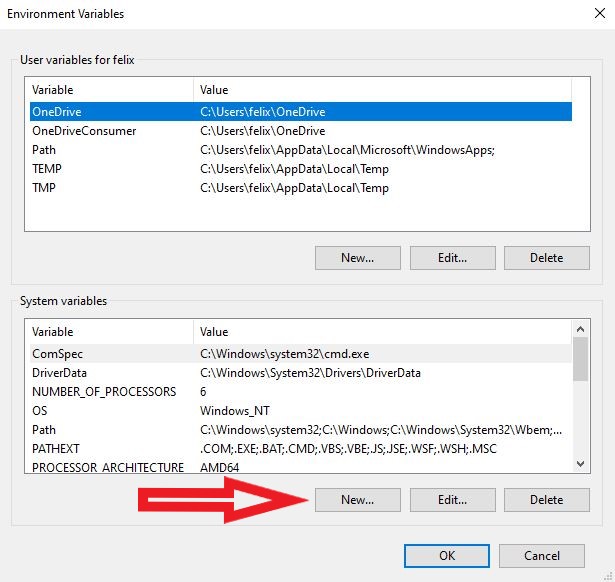
      Variable name: YASMPATH
      Variable value: C:\Program Files\YASM
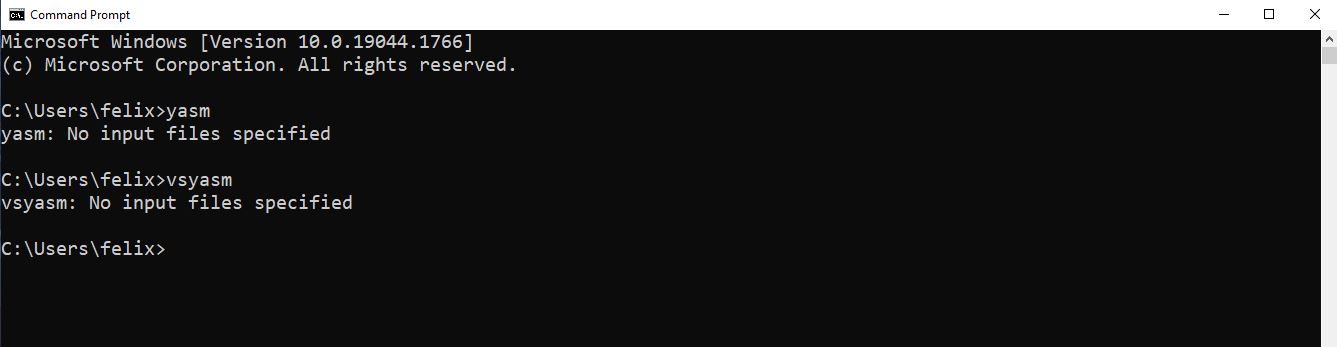
    10. Close the windows by clicking on "OK"
  9. To check if the configuration is working correctly, please open a command prompt and watch the output of the following command:

    yasm


    and

    vsyasm


Installation of Microsoft Visual C++ 1.52

  1. Visual C++ 1.52 is available via the paid Microsoft MSDN subscription. If you do not have a subscription, you download the ISO image via the internet archive:
    https://archive.org/details/ms-vc152
  2. Create the folder “C:\MSVC15”
  3. Mount the ISO file and copy the content of the folder “MSVC” to “C:\MSVC15”
  4. Create a system variable for Microsoft Visual C++ 1.52
    1. Open a file explorer
    2. Within the left file tree, please make a right click on "This PC" and select "Properties"
    3. Within the right menu, please click on "Advanced system settings"
    4. Please click on "Environment Variables"
    5. Within the area of the system variables, please click on "New..."
    6. Fill out the form with the following values:

      Variable name: MSVC16_ROOT
      Variable value: C:\MSVC15

    7. Close the windows by clicking on "OK"

Installation of the Windows SDK 7.1

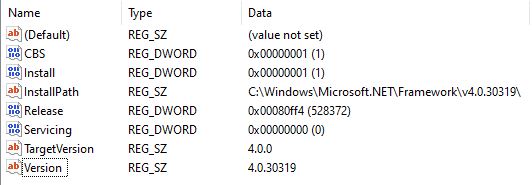
The installer requires .Net Framework 4 (Not a newer one like .Net Framework 4.8!). Since a newer version is already preinstalled with Windows 10, the installer has to be tricked:

  1. Click on the start button and search for: "regedit.msc". Start the first finding.
  2. Navigate to "HKEY_LOCAL_MACHINE\SOFTWARE\Wow6432Node\Microsoft\NET Framework Setup\NDP\v4\"
  3. Change the permissions for the "Client" folder, so you can edit the keys:
    1. Right click on the subfolder "Client" and select "Permissions..."
    2. Click on "Advanced"
    3. Change the owner to your user and click on "Add"
    4. Set the principal to your user, select "Full Control" and click on "OK"
    5. Within the folder "Client" note down the value of the entry "Version"
    6. Doubleclick on the entry "Version" and change the value to "4.0.30319"
  4. Change the permissions for the "Full" folder, so you can edit the keys:
    1. Right click on the subfolder "Full" and select "Permissions..."
    2. Click on "Advanced"
    3. Change the owner to your user and click on "Add"
    4. Set the principal to your user, select "Full Control" and click on "OK"
    5. Within the folder "Full" note down the value of the entry "Version"
    6. Doubleclick on the entry "Version" and change the value to "4.0.30319"
  5. Download the Windows SDK 7.1 at:
    https://www.microsoft.com/en-us/download/details.aspx?id=8279
  6. Run the downloaded file as administrator and install the application with default settings
  7. After the installation, revert the changes done in the registry editor.
    Note: The owner "TrustedInstaller" can be restored by searching for: "NT Service\TrustedInstaller"

Installation of the Windows Driver Kit 7.1

  1. Please download the ISO of the Windows Diver Kit 7.1 at:
    https://www.microsoft.com/en-us/download/details.aspx?id=11800
  2. Mount the downloaded ISO file by doubleclicking it
  3. Run the file "KitSetup.exe" as administrator. Within the installation select all features to be installed.
    Note: It might be that during the installed you are requested to install the .NET Framework 3.5. In this case click on "Download and install this feature".
  4. Install the Driver Kit to the default location

Installation of the Windows 8.1 SDK

  1. Please download the ISO of the Windows 8.1 SDK at:
    https://developer.microsoft.com/de-de/windows/downloads/sdk-archive/
  2. Run the downloaded file as administrator and install the Windows 8.1 SDK with default settings
  3. Create a system variable for the Windows 8.1 SDK
    1. Open a file explorer
    2. Within the left file tree, please make a right click on "This PC" and select "Properties"
    3. Within the right menu, please click on "Advanced system settings"
    4. Please click on "Environment Variables"
    5. Within the area of the system variables, please click on "New..."
    6. Fill out the form with the following values:

      Variable name: WSDK81
      Variable value: C:\Program Files (x86)\Windows Kits\8.1\

    7. Close the windows by clicking on "OK"

Installation of gzip

  1. Please create the following folder:
    C:\Program Files (x86)\gzip
  2. Please download gzip version at:
    https://sourceforge.net/projects/gnuwin32/files/gzip/1.3.12-1/gzip-1.3.12-1-bin.zip/download?use-mirror=netix&download=
  3. Copy the content of the downloaded zip to “C:\Program Files (x86)\gzip”
  4. Add gzip to the path Variable. This will make the command globally available on the command line.
    1. Open a file explorer
    2. Within the left file tree, please make a right click on "This PC" and select "Properties"
    3. Within the right menu, please click on "Advanced system settings"
    4. Please click on "Environment Variables"
    5. Within the area of the system variables, please select the "Path" variable and click on "Edit..."
    6. Click on "New" and add the following value:

      C:\Program Files (x86)\gzip\bin

    7. Close the windows by clicking on "OK"
  5. To check if the configuration is working correctly, please open a command prompt and watch the output of the following command:

    gzip


Installation of upx

  1. Please create the following folder:
    C:\Program Files (x86)\upx
  2. Please download the latest upx-X-XX-win64.zip version at:
    https://github.com/upx/upx/releases/tag/v3.96
  3. Copy the content of the downloaded zip to “C:\Program Files (x86)\upx”
  4. Add gzip to the path Variable. This will make the command globally available on the command line.
    1. Open a file explorer
    2. Within the left file tree, please make a right click on "This PC" and select "Properties"
    3. Within the right menu, please click on "Advanced system settings"
    4. Please click on "Environment Variables"
    5. Within the area of the system variables, please select the "Path" variable and click on "Edit..."
    6. Click on "New" and add the following value:

      C:\Program Files (x86)\upx

    7. Close the windows by clicking on "OK"
  5. To check if the configuration is working correctly, please open a command prompt and watch the output of the following command:

    upx


Installation of 7zip

  1. Please download the latest version of 7zip at:
    https://www.7-zip.de/
  2. Run the downloaded file as administrator and install 7zip with default settings

Installation of Wix3

  1. Please download wix311.exe at:
    https://github.com/wixtoolset/wix3/releases
  2. Run the downloaded file as administrator and install WiX Toolset with default settings

Installation of Microsoft Visual Studio 2019

  1. Visit the following Microsoft website and log in with a free Microsoft account:
    https://my.visualstudio.com/Downloads?q=visual%20studio%202019%20Professional
  2. Please download the latest (trial) version of “Visual Studio Professional 2019”
  3. Run the downloaded file as administrator and go through the wizard.
    Select the following Workloads for installation:
    1. Desktop development with C++
    2. .NET desktop development
    Select the following individual components for installation:
    1. .NET
      1. .NET 6.0 Runtime
      2. .NET Core 3.1 Runtime (LTS)
      3. .NET Framework 4 targeting pack
      4. .NET Framework 4.5 targeting pack
      5. .NET Framework 4.5.1 targeting pack
      6. .NET Framework 4.5.2 targeting pack
      7. .NET Framework 4.6 targeting pack
      8. .NET Framework 4.6.1 targeting pack
      9. .NET Framework 4.7.2 targeting pack
      10. .NET Framework 4.8 SDK
      11. .NET Framework 4.8 targeting pack
      12. .NET SDK
      13. ML.NET Model Builder (Preview)
    2. Cloud, database, and server
      1. CLR data types for SQL Server
      2. Connectivity and publishing tools
    3. Code tools
      1. NuGet package manager
      2. Text Template Transformation
    4. Compilers, build tools, and runtimes
      1. .NET Compiler Platform SDK
      2. C# and Visual Basic Roslyn compilers
      3. C++ 2019 Redistributable Update
      4. C++ CMake tools for Windows
      5. C++/CLI support for v142 build tools (Latest)
      6. MSBuild
      7. MSVC v142 - VS 2019 C++ ARM64 build tools (Latest)
      8. MSVC v142 - VS 2019 C++ ARM64 Spectre-mitigated libs (Latest)
      9. MSVC v142 - VS 2019 C++ x64/x86 build tools (Latest)
      10. MSVC v142 - VS 2019 C++ x64/x86 Spectre-mitigated libs (Latest)
    5. Debugging and testing
      1. .NET profiling tools
      2. C++ AddressSanatizer
      3. C++ profiling tools
      4. Just-In-Time debugger
      5. Test Adapter for Boost.Test
      6. Test Adapter for Google Test
    6. Development activities
      1. C# and Visual Basic
      2. C++ core features
      3. F# language support
      4. IntelliCode
      5. JavaScript and TypeScript language support
      6. Live Share
    7. Emulators
        NONE
    8. Games and Graphics
      1. Graphics debugger and GPU profiler for DirectX
    9. SDKs, libraries, and frameworks
      1. C++ ATL for latest v142 build tools (ARM64)
      2. C++ ATL for latest v142 build tools (x86 & x64)
      3. C++ ATL for latest v142 build tools with Spectre Mitigations (ARM64)
      4. C++ ATL for latest v142 build tools with Spectre Mitigations (x86 & x64)
      5. C++ MFC for latest v142 build tools (ARM64)
      6. C++ MFC for latest v142 build tools (x86 & x64)
      7. C++ MFC for latest v142 build tools with Spectre Mitigations (ARM64)
      8. C++ MFC for latest v142 build tools with Spectre Mitigations (x86 & x64)
      9. Entity Framework 6 tools
      10. TypeScript 4.3 SDK
      11. Windows 10 SDK (10.0.19041.0)
      12. Windows Universal C Runtime

Installation of the Windows Driver Kit version 2004

  1. Please download the Windows Driver Kit (WDK) version 2004 at:
    https://docs.microsoft.com/en-us/windows-hardware/drivers/other-wdk-downloads
  2. Run the downloaded file as administrator and install the WDK with default settings
  3. At the end of the installation you will be asked if you want to "install Windows Driver Kit Visual Studio extension".
    Please make sure, that this option is selected before closing the dialog.
  4. A different setup will start automatically and will detect Visual Studio Professional 2019 as possible target for the extension.
    Please select it and proceed with the installation.

Installation of the Visual Studio build tools

  1. Visit the following Microsoft website and log in with a free Microsoft account:
    https://my.visualstudio.com/Downloads?q=visual%20studio%202019%20build%20tools
  2. Please download the latest version of “Build Tools for Visual Studio 2019”
  3. Run the downloaded file as administrator and go through the wizard. Select the following individual components for installation:
    1. .NET
        NONE
    2. Cloud, database, and server
        NONE
    3. Code tools
        NONE
    4. Compilers, build tools, and runtimes
      1. C++/CLI support for v142 build tools (Latest)
      2. MSVC v142 - VS 2019 C++ ARM64 build tools (Latest)
      3. MSVC v142 - VS 2019 C++ ARM64 Spectre-mitigated libs (Latest)
      4. MSVC v142 - VS 2019 C++ x64/x86 build tools (Latest)
      5. MSVC v142 - VS 2019 C++ x64/x86 Spectre-mitigated libs (Latest)
    5. Debugging and testing
        NONE
    6. Development activities
        NONE
    7. SDKs, libraries, and frameworks
      1. C++ ATL for latest v142 build tools (ARM64)
      2. C++ ATL for latest v142 build tools (x86 & x64)
      3. C++ ATL for latest v142 build tools with Spectre Mitigations (ARM64)
      4. C++ ATL for latest v142 build tools with Spectre Mitigations (x86 & x64)

Download VeraCrypt Source Files

  1. Visit the VeraCrypt Github repository at:
    https://github.com/veracrypt/VeraCrypt
  2. Please click on the green button with the label "Code" and download the code.
    You can download the repository as zip file, but you may consider to use the git protocol in order to track changes.

Compile the Win32/x64 Versions of VeraCrypt

  1. Please open the file "src/VeraCrypt.sln" in Visual Studio 2010
  2. Please select "All|Win32" as active configuration
  3. Please click on "Build -> Build Solution"
  4. The compiling process should end with warnings, but without errors. Some projects should be skipped.
  5. Please select "All|x64" as active configuration
  6. Please click on "Build -> Build Solution"
  7. The compiling process should end with warnings, but without errors. Some projects should be skipped.
    Please close Visual Studio 2010 after the compiling process finished

Compile the ARM64 Version of VeraCrypt

  1. Please open the file "src/VeraCrypt_vs2019.sln" in Visual Studio 2019
  2. Please select "All|ARM64" as active configuration
  3. Please click on "Build -> Build Solution"
  4. The compiling process should end with warnings, but without errors. One project should be skipped.
    Please close Visual Studio 2019 after the compiling process finished

Build the VeraCrypt Executables

  1. Please open a command line as administrator
  2. Go into the folder "src/Signing/"
  3. Run the script "sign_test.bat"
  4. You will find the generated exectuables within the folder "src/Release/Setup Files"

Import the Certificates

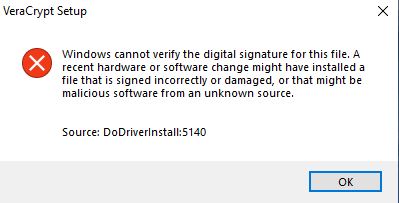
With the sign_test.bat script you just signed the VeraCrypt executables. This is necessary, since Windows only accepts drivers, which are trusted by a signed Certificate Authority.
Since you did not use the official VeraCrypt signing certificate to sign your code, but a public development version, you have to import and therefore trust the certificates used.

  1. Open the folder "src/Signing"
  2. Import the following certificates to your Local Machine Certificate storage, by double clicking them:
    • GlobalSign_R3Cross.cer
    • GlobalSign_SHA256_EV_CodeSigning_CA.cer
    • TestCertificates/idrix_codeSign.pfx
    • TestCertificates/idrix_Sha256CodeSign.pfx
    • TestCertificates/idrix_SHA256TestRootCA.crt
    • TestCertificates/idrix_TestRootCA.crt
    Note: If prompted, the password for .pfx certificates is idrix.

Known Issues

  • This distribution package is damaged

    On Windows 10 or higher you might get the error message above. In order to avoid this, you will need to:
    • Double-check the installation of the root certificate that issued the test code signing certificate in the "Local Machine Trusted Root Certification Authorities" store.
    • Compute SHA512 fingerprint of the test code signing certificate and update the gpbSha512CodeSignCertFingerprint array in the file "src/Common/Dlgcode.c" accordingly.
    Please see https://sourceforge.net/p/veracrypt/discussion/technical/thread/83d5a2d6e8/#db12 for further details.

    Another approach is to disable the signature verification in the VeraCrypt code. This should be done only for testing purposes and not for production use:
    1. Open the file "src/Common/Dlgcode.c"
    2. Look for the function "VerifyModuleSignature"
    3. Replace the following lines:
      Find:

      if (!IsOSAtLeast (WIN_10))
      return TRUE;


      Replace:

      return TRUE;

    4. Compile the VeraCrypt code again
  • Driver Installation Failure during VeraCrypt Setup from Custom Builds

    Windows validates the signature for every driver which is going to be installed.
    For security reasons, Windows allows only drivers signed by Microsoft to load.
    So, when using a custom build:
    • If you have not modified the VeraCrypt driver source code, you can use the Microsoft-signed drivers included in the VeraCrypt source code (under "src\Release\Setup Files").
    • If you have made modifications, you will need to boot Windows into "Test Mode". This mode allows Windows to load drivers that aren't signed by Microsoft. However, even in "Test Mode", there are certain requirements for signatures, and failures can still occur due to reasons discussed below.
    Potential Causes for Installation Failure under "Test Mode":
    1. The certificate used for signing is not trusted by Windows
      You can verify if you are affected by checking the properties of the executable:
      1. Make a right click on the VeraCrypt Setup executable: "src/Release/Setup Files/VeraCrypt Setup 1.XX.exe"
      2. Click on properties
      3. Go to the top menu "Digital Signatures". Her you will find two signatures in the Signature list
      4. Check both by double clicking on it. If the headline says "The certificate in the signature cannot be verified", the corresponding signing certificate was not imported correctly.
        Click on "View Certificate" and then on "Install Certificate..." to import the certificate to Local Machine certificate storage. For the Root certificates, you may need to choose "Place all certificates in the following store", and select the "Trusted Root Certification Authorities" store.

    2. The driver was modified after the signing process.
      In this case, please use the script "src/Signing/sign_test.bat" to sign your code again with the test certificates